Lab Series #1: Luminescence
Greetings
Earlier, I had been having a second blog to focus on writing some basic stuff in the laboratory. But the blog has been now inactive for more than a year and half. I plan to close the blog since I cannot keep it up. But then completely deleting the blog will close down a great deal of information that I have put down. Many posts have had more than 3K+ views each. So, I will migrate posts one by one to this blog so that the content will be out there. All the posts will be posted as Lab Series, and in course, am planning to add some posts on new topics.
Let me start with "luminescence", one of the most common laboratory tool. In simplest terms, Luminescence is emission of light by a substance. The most known among phenomenon of luminescence is fluorescence, phosphorescence and bioluminescence.
 |
| Fig 1: Energy states in fluorescence and phosphorescence Source |
Fluorescence is defined as the emission of light by a chemical substance that has absorbed electromagnetic radiation. It should be noted that in fluorescence a high energy, short wavelength light is directed onto a chemical causing emission of lower energy, longer wavelength of spectra. The Figure 1 on right, shows the diagrammatic representation of fluorescence. In this case, a chemical absorbs certain spectra, gets excited and reaches back to a ground state. So how does it differ from Phosphorescence? In fluorescence, after excitation and reaching a high exited second singlet state (Half life of aprox 10-12 sec), it looses a considerable amount of heat and reaches exited First singlet state (Half life of aprox 10-9 sec). From here if the state drops of back to ground state its fluorescence. If it goes into a Metastable triplet state (Half life of aprox 10-3 sec), and then drops of to ground state it is phosphorescence. If that explanation sounds too much techie, then a simpler version is fluorescence is almost spontaneous, whereas phosphorescence is a bit late luminescence. Please note that fluorescence and phosphorescence are just different versions of luminescence.
 |
Photo 1: Phosphorescence.
|
 |
Photo 2: Fluorescence
|
As a note, let me add a point. Because of the significant difference in time, fluorescence works only as long as it is exposed to source light. In contrast, phosphorescence works for a significant time after the source light is ceased. This has important applications in wide range of field.
Coming to the 3rd important type, Bioluminescence. The term basically refers to a process of emitting light by a living cell which actually represents a complex set of reactions. The bioluminescence is of great importance to the organism and seen in organisms such as Vibrio fischeri (This phenomenon made way for discovery of quorum sensing. Link) and other deep sea creatures where sunlight doesn't reach (For a explanation go here). Why does this luminescence phenomenon happening in world of chemistry and deep sea biology interest we clinical technologists? Its their extreme sensitivity and high diagnostic significance that interests us.
Fluorescence Microscopy:
Let me start with an analogy. If your to look into the sky no matter what sophisticated technology you use, the chance that you see a star is very bleak. That is because your detection sensitivity is blurred by light. In night if you are to do the same experiment, you could see stars much easily. That is because in a dark background a shiny material is easily detected. (In fact the Dark Ground microscopy works on almost same principle). So if your able to coat specific substances with fluorescent dyes and then observe them in a dark background you are much more likely to detect. This is of great value in microbiology diagnostics, cell imaging, FISH analysis etc. There is a high sensitivity. But, there is a problem. Everything in the sample will glow and I may have hard time figuring out what I want to study. I can increase the specificity by creating some specific antibodies and then linking the antibody to a fluorescent dye.
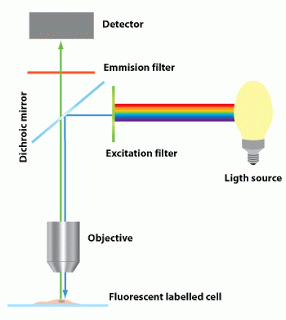 |
| Fig 2: Basic design of fluorescence microscope. Source |
The basic design of a fluorescence microscope consists of
1. Light source
2. Dichroic mirror
3. Set of filters and lenses.
Lets look into individual parts. The source of light is usually a mercury burner, ranging in wattage from 50 watts to 200 watts and the xenon burners ranging from 75 watts to 150 watts. Of note, mercury and xenon arc lamps pose a danger of explosion (if mishandled) due to very high internal gas pressures and extreme heat generated during use. Tungsten/halogen lamp versions are also used sometimes. However, the shelf life of these components are low. The modern designs use LED systems which have high shelf life.
Excitation filters are optical components placed in the path of illumination. The function is to filter out all wavelengths of the light source, except for the excitation range of the fluorophore under detection. A special dual band excitation filter is used in confocal microscopy (Read more).
The third most important composition is a dichroic mirror. People often use beam splitters as an inter-changeable term. However, this is not true. A beamsplitter directs light (reflects and transmits) independent of wavelength with a net efficiency of only 25%. Dichroic mirrors are wavelength dependent but with a higher efficiency. Thus for different wavelengths a different mirror is required (Reference). The most common dichroic mirrors come in 4 designs. Short wave pass design (SWP), Long wave pass (LWP) design, or Bandpass design (Notch filter is a variant of bypass). The newer high end designs such as polarizing band pass, ultrabroad band mirrors are modifications (See more). SWP dichroic show a high transmission for a short wavelength band, high damage thresholds, and high reflectivity for a longer band of wavelengths.A LWP transmits the longer wavelength and reflects the shorter wavelength. (Source). A bandpass design is a optical filter that has a well-defined short wavelength cut-on and longwavelength cut-off. Bandpass filters are denoted by their center wavelength and bandwidth (Reference). They are the most commonly used models. Notch filters are band pass filters in the upside down position. The dichroic filters are a subtype of Interference filters. Other filters that can be used is classified as
1. Interference filters: Dichroic, Dielectric, reflective filters- They reflect the unwanted wavelengths
2. Absorptive filters: Color glass filters- They absorb the unwanted wavelengths
 |
| Photo 3: Dichroic mirror. Source |
Emission fliter (barrier filter), is typically a bandpass filter that passes only stringent wavelengths emitted by the fluorophore and restricts all undesired light outside this band – especially the excitation light. This ensures blocking of autofluorescence, reduction in noise, unwanted and dangerous signals such as UV etc. Most of the instruments incorporate a heat filter near the emission filters (this may be also be put in the lighting chamber).
And of course, a set of lenses that is basic for magnification and imaging of cells is incorporated to the design.
Direct fluorescence:
 |
| Photo 4: Direct Fluorescence. Source |
The advantage of method is higher sensitivity,compared to routine staining methods but compromises specificity.
Immunofluorescence:
 |
Photo 5: Immunofluorescence
|
The advantages of DIM is that the method can be directed almost against any antigen and thus we can detect any type of cell by targeting a specific antigen. The advantage of IIF is that it can be used to detect antibody (usually evidence of infection) and the tagged antibody can be made universal. The disadvantage of all the fluorescence method is in its cost and specialized equipment's.
Noise in fluorescence microscope represents the non specific fluorescence producing a blurred image. This is often unavoidable in routine microscopes. In the ppt shown below, the images in page 2, the upper images represent the image in routine fluorescent imaging microscopes. They may be enhanced by various methods such as reducing the aperture that allows light. But confocal microscopy is the best answer. The signal to noise ratio is considered as the best indicator of microscope performance. Another important hindering concept in fluorescence microscopy is Photobleaching. It is the photochemical destruction of a fluorophore due to prolonged exposure of dye to light source.
The last point that I want to impress in this post is use of specific dyes. Dyes are available to track specific components of a cell without immuno-labeling and present with a great opportunity in live cell imaging. E.g include Hoechst 33258 and DAPI for DNA, Cy5 dye for calcium, Rhodamine123 for mitochondrion etc.
 |
Photo 6: Glowing mushroom.
|
Bioluminescence as I have already described refers to production of light by a living cell in contrast to chemicals. The one thing that you must note here is that there is no excitation light. A reaction inside the cell causes the production of light. Here the chemical energy is converted to light energy. In my last post I had told that bioluminescence is usually seen in deep sea creatures. But, I forgot to mention that it can also be seen in land animals. The photo of a glowing mushroom (Mycena lux-coeli mushrooms) illustrates this fact.
So what exactly is this bioluminescence? First I would like to impress the fact, no matter which cell is lighting in the world, the basic chemistry is the same. (Fluorescent proteins such as GFP is a different phenomenon according to me which I will discuss later). The chemical machinery involves the following set of components (Source).
 |
| Fig 3: Basic chemistry of bioluminescence. Source |
- Luciferase
- Adenosine triphosphate
- Luciferin
- Oxygen
The simplest formula for bioluminescence is expressed as follows
ATP(energy) + Luciferin (substrate) + Luciferase (enzyme) + O2(oxidizer)---> Light (photons)
Luciferase enzyme:
Luciferase are a class of enzyme (EC 1.13.12.7) that can oxidize luciferin group of compounds to yield light. The structure of luciferase differs among species.
Luciferin:
Luciferin is a group of molecule that can be oxidized catalytically to produce light and oxyluciferin. Different types of luciferin are used by different organisms. The most common naturally encountered in sea is the coelenterazine which is a type of imidazolopyrazine. By tweaking and jiggling with some amino acids we can create many coloring patterns. Owing to interesting color patterns produced they are sometimes referred to as rainbow proteins.
The chemistry reads so. Luciferin is combined with ATP to form a complex called luciferyl adenylate. This is fed into the luciferase active site with oxygen. The reaction yields the production of a cyclic peroxide that eventually becomes high-energy oxyluciferin. The high energy is unstable. This get backs to its ground state emitting energy. A great deal of debate is prevalent in scientific community as to what is the trigger. Its just worth to mention that there are 3 hypothesis here. For people interested to learn more I have given links
Bioluminescence has gained large popularity in Cellular research and in diagnostics. The basic idea reads so. By genetic engineering methods the luciferase gene system is attached to a gene of interest (The expression of which is to be studied). So when there are optimal conditions for the transcription, the luciferase is expressed and by using suitable substrate the expression is detected. This methods has been of extreme importance in studying various transcription factors. If you are thinking that this is only of research interest, then let me tell you. The method can be used for rapid detection of Mycobacterium tuberculosis. The Figure 4 below explains how it works.
 |
| Fig 4: Luciferase reporter phage assay |
The method takes roughly 4 days to complete which is by far way ahead of other TB detection methods. How do you detect the signal. The luminescence signals are detected by the help of a special type of colorimeter called as a Luminometer. A luminometer measures the luminescence and quantifies the light. Higher the measurement more is the activity.
 |
Photo 7: Aequorea victoria.
|
A molecule of extreme interest to biologists is the fluorescent protein. This elegant phenomenon is seen in proteins expressed by a jelly fish (Aequorea victoria; photo to the left). The naturally occurring GFP (Green fluorescent protein), is 238 AA long protein. Its role is to transduce the blue chemiluminescence of the protein aequorin into green fluorescent light by energy transfer with a absorbance/ excitation peak at 395 nm, fluoresces in vivo upon receiving energy from the Ca2+-activated photoprotein aequorin. (Source). The structure of green fluorescent protein shows a cylindrical shape, with eleven beta-strands make up the beta-barrel and an alpha-helix runs through the center.
 |
Fig 5: Structure of GFP.
|
The chromophore is the most important part of a Fluorescent protein. It is proposed that the Arg96 plays a crucial role in self catalysis by GFP. By varying the chemistry of chromophore a battery of artificial fluorescent proteins have been created. One additional note here. Aequorin is a monomeric calcium binding protein that emits light upon reacting with calcium. The protein has three calcium binding sites, three cysteine residues, and a noncovalently bound chromophore that consists of coelenterazine and molecular oxygen. Light is emitted via an intramolecular reaction in which coelenterazine is oxidized by the bound oxygen (For source and more information click here).
Understanding of this leads me to one more common laboratory experiment. FRET tests. FRET stands for Fluorescent resonance energy transfer. The principle of this test less complex than the name itself. FRET is a non radiative transfer of excited state energy from one fluorophore to another. Let me simplify. The first step is to absorb a light from a source. This light causes fluorescence. But even before the light escapes a 2nd fluorphore (which has absorption spectra in the emission range of first fluorophore) is taken up and emits its emission spectra. The requirement of this sort of energy transfer. The distance between two fluorophores should be no more than 10 angstrom distance. This means only close molecules something like a receptor and ligand binding will show FRET.
 |
Fig 6: FRET between CFP and YFP to
measure protein interactions.
|
In the above diagram CFP (Cyanine fluorescent protein) is linked to compound Z, and YFP (Yellow fluorescent protein) is linked to Y. We are interested to know if Y and Z have affinity to each other. If they do when i shine a light in absorption spectra, the light detected will be in emission spectra of YFP. If not, the emission spectra detected will be in CFP range (Distance between molecules is more to undergo FRET). Simple. A modification of this method is BRET (Bioluminescence resonance energy transfer).
So I was talking about luminescence. First I told you what is the concept of luminescence and what types we know about. Then I talked about fluorescence and about bioluminescence. I also described its application in clinical research and basic laboratory science. The next part is to talk about "Chemical Luminescence or Chemiluminescence".
In general terms chemiluminescence is classified into 3 types (Source)
- Chemical reactions using synthetic compounds and usually involving a highly oxidized species such as a peroxide are commonly termed chemiluminescent reactions.
- Light-emitting reactions arising from a living organism, such as the firefly or jellyfish, are commonly termed bioluminescent reactions.
- Light-emitting reactions which take place by the use of electrical current are designated electro-chemiluminescent reactions.
 |
| Fig 7: Chemiluminescent reaction of luminol. Source |
As I have already said, Bioluminescence should be otherwise considered as different form chemiluminescence. There exists a simple common principle behind bio and chemi- luminescence. The similarity is that, both involve reactions with O-O bond in peroxide compounds, to produce a high energy state culminating in ground state releasing extra energy as light. The distinction from fluorescence and phosphorescence here is that there is no source light. Fig 7, Illustrates the chemiluminescence reaction of a common lab compound, "Luminol".
Luminol
IUPAC Name: 5-Amino-2,3-dihydro- 1,4-phthalazinedione.
Molecular formula: C8H7N3O2
 |
Fig 8: Structure of luminol.
|
When luminol reacts with a hydroxide salt, a dianion is formed. The oxygen from the hydrogen peroxide reacts with luminol dianion to form an unstable organic peroxide (3-aminopthalate). Stability is achieved by losing a nitrogen, emitting the extra energy as a photon. This emitting of the photon produces a blue light.
Luminol is not the only compound of use in chemiluminescence. A large list of growing compounds is now available in the commercial market. This includes (but not limited to) the following list
- Isoluminol
- Aminoethyl isoluminol (AEI)
- Aminoethylethyl isoluminol (AEEI)
- Aminobutyl isoluminol (ABI)
- N- (4-Aminobutyl) N-ethyl isoluminol (ABEI)
- 6-isothiocyanatobenzophthalazine-1,4(2H,3H)-dione (IPO)
- 3-propyl-7,8-dihydropyridazino[4,5-g]quinoxaline-2,6,9(1H)-trione (PDIQ)
- 3-benzyl-7,8-dihydropyridazino[4,5-g]quinoxaline-2,6,9(1H)-trione (BDIQ)
Use of chemiluminescence in Forensics
 |
Photo 8: The result of luminol and blood
mixed together.
|
Chemiluminescence Immunoassay (CLIA)
CLIA is a simple modification of ELISA technique. The difference is in substrate which is luminol here. Lets consider one scenario. Detection of Antibody say for example. A microwell consisting of respective specific antigen is coated to the well. The sample in which Ab is to be detected is added to this microwell. The first step here is formation of antigen antibody complex. The second step is to use a conjugate that attacks the primary antibody. The conjugate contains enzyme (usually HRP or Horse-raddish peroxidase) that catalyzes the luminol to produce light. The light is measured in a special instrument called as luminometer. By varying this technique just like in ELISA, we can detect antigen or antibody.
 |
| Fig 9: Chemiluminescence. Source |
As a ending note, I leave you with some common dyes used in laboratory with their properties. (Source: Text book of Biochemistry and Molecular biology; Keith Wilson and John Walker).
Fluorophore
|
Excitation maximum (in nm)
|
Emission maximum (in nm)
|
Fluorescein
|
496
|
518
|
Bodipy
|
503
|
511
|
Cy3
|
554
|
568
|
Tetramethyl rhodamine
|
554
|
578
|
Lissamine rhodamine
|
572
|
590
|
Texa Red
|
592
|
610
|
Cy5
|
652
|
672
|
Nuclear specific dyes
| ||
Hoechest 33342
|
346
|
460
|
DAPI
|
359
|
461
|
Acridine orange
|
502
|
526
|
Propidium iodide
|
536
|
617
|
TOTO3
|
642
|
661
|
Ethidium bromide
|
510
|
595
|
Ethidium homodimer
|
528
|
617
|
Feulgen
|
570
|
625
|
Calcium indicators
| ||
Fluo-3
|
506
|
526
|
Calcium green
|
506
|
533
|
Mitochondrion specific dyes
| ||
JC-1
|
514
|
529
|
Rhodamine 123
|
507
|
529
|
Reporter molecules
| ||
GFP
|
395/489
|
509
|
Ds Red
|
558
|
583
|
Further Reading:
- Introduction to Fluorescent microscopy, Nikon Website
- Fluorescence microscopy, Olympus website
- FRET with Spectral Imaging and Linear Unmixing. Link
- Rajesh Babu Sekar and Ammasi Periasamy. Fluorescence resonance energy transfer (FRET) microscopy imaging of live cell protein localizations. March 3, 2003 // JCB vol. 160 no. 5 629-633. doi: 10.1083/jcb.200210140. Link
- Junichi Ishida, Maki Takada, Tomohiro Yakabe, Masatoshi Yamaguchi. Chemiluminescent properties of some luminol related compounds. Dyes and Pigments. Volume 27, Issue 1, 1995, Pages 1–7. Link
- Cyanagen website Link
- Rhyne PW, Wong OT, Zhang YJ, Weiner RS. Electrochemiluminescence in bioanalysis. Bioanalysis. 2009 Aug;1(5):919-35. Link


Comments
Post a Comment